Showing posts with label color. Show all posts
Showing posts with label color. Show all posts
Monday, February 24, 2014
The Agave Color Antique Dresser Make over
Here is my newest re-do (Im on a tear lately refinishing stuff!).
This was a nice little antique dresser I picked up from CL. I met a lady
who handles estate sales. She got this from the original owner, so it was in ok
shape. The top was pretty messed up and it
had a lot of dings and scratches, but the drawers were in pretty
good condition for being 80 years old!

 |
| two sided sticky tape was used to affix the mirror to the back:( Im still working on fixing and painting the mirror part.  |
Mr. Agave!
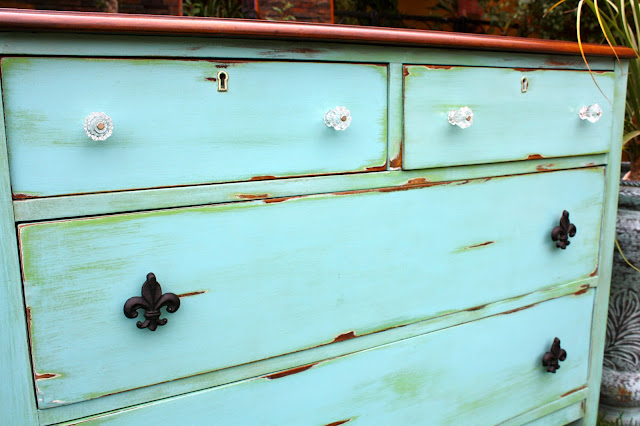
So I wanted to do an aqua-y color, but I wanted a bit of green to show through.
So I wanted to do an aqua-y color, but I wanted a bit of green to show through.
I just love blues and greens. So I played around with the colors and used my
new shades from Martha.

 |
| This photo was used with a flash. You can see how the color washes out. |
I brushed on Behrs "lilypad" before going over it with my chalk paint made from
MS "lagoon".

The top I refinished in Varathane "Gel Walnut". This stuff is the bomb people.
Forget the Minwax. This gel stain is fabuloso!!! So easy and nice and comes out
flawless. It dried so quickly because this wood was so dried out. I used one
coat of the gel, a seal-coat, and then finished it with dark paste wax.
The whole dresser got a coat of dark wax to tone down the color
and give it an aged look.
I really hate the waxing process. :)

 |
| It was a cloudy afternoon. Again, the flash just kills the colors. |
I wasnt sure which hardware to go with. I tried on many different knobs.
I didnt have anything in the blue/green family except some light blue milk glass.
It looked a bit nursery-ish and too close to the color of the paint.

I was going to line the drawers with this fabric. Apparently Ill have to line it with the cat as well.


I still have to do the arm thingy-s that allow it to move.


The mirror by itself is actually a beautiful piece. Since the piece that was affixed to the top with
sticky tape was literally falling apart, Hub made a new one to set on the top. There is another piece
that attaches to the mirror (I dont have that in the photo)Im actually leaving that natural wood.


Sunday, February 23, 2014
MIXING BROWN PAINT PAINTING HARDWARE COLOR LAYERING
I first showed you this big nine drawer French Provincial dresser at the beginning of the week:
http://blogspot.ca/2013/12/generosity-hard-work-and-provence.html

Painted in Provence this piece would benefit from having a dark stained top, however as I dont have
a workshop and the outside weather was not going to allow me to strip it I had to come up with a
different plan for indoors. That plan was a distressed 4 layer paint finish.


I started by painting the top brown.
Annie Sloan does not have a chocolate brown paint currently so I mixed my own.
You can make brown by mixing blue and orange, or red and green, or yellow and purple.
This is the first step to making brown but to change hue and shades be sure to read this:
http://www.wikihow.com/Mix-Paint-Colors-to-Make-Brown

Then I painted the top with AS Old Ochre, a strong crème color.
I waxed the edges on this layer to strengthen the white color for distressing later.

The 3rd layer was AS Provence, the same blue I painted the body of the dresser.
This layer was completely waxed and distressed all over.

Then came the final layer of the same brown you started with. I used a clear wax for my finished
look. You could try a dark wax to get more depth but I wanted the blue showing through to hold
the same color as the body.

When working on something like this be brave and experiment. Try different distressing technics all
on the same surface. Use different sand paper grits and try sanding before and after waxing. Trying
new things is what will achieve new results. The top of your projects can always look different than
the bottom and a nice large flat surface is the best place to practice.


The body of this dresser was done much simpler by painting a quick coat of AS Old Ochre,
followed by a good layer of AS Provence. Only clear waxing over the blue.

Below is a close up of some distressing done on the drawers with a light hand and a 220 grit sand
paper. Done right you get to see the light color of the Old Ochre showing through.
All my sanding is done by hand.

The handles I used are original but they were almost a black color. I wanted a warmed up tone so I
lightly sprayed them with a Tremclad gold hammered finish. I didnt want a solid gold either so I
washed them with some acetone so they would have an aged gold feel. Acetone is the same as your
nail polish remover.


*********************************
Stop in to see whats new in shabby chic white hardware available at firstfinds.


There are over 1000 pieces of used hardware to choose from
Etsy Shop.

Subscribe to:
Posts (Atom)